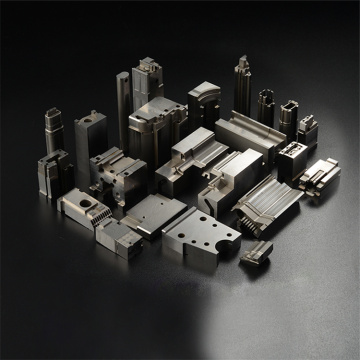
Design Process for Precision Stamping Dies
Designing precision stamping dies is a complex process involving several steps to ensure the functionality and production efficiency of the die. The typical design process includes the following main steps:
1. Provide CAD or PDF, JPG, 2D, or 3D Drawings: Submit detailed drawings and related requirements to the engineers for price estimation. After confirming the quotation, place the order accordingly.
2. 3D Model Construction: Engineers will build a 3D model based on the provided 2D drawings and related requirements.
CNC Programming: CNC programmers will write the numerical control or printing programs based on the product’s 3D model and specifications.
3. Machining: Technicians will load the materials and begin machining as per the requirements.
4. Post-Machining Processing: After machining, perform self-inspection, remove burrs and sharp edges, polish the surface, and carry out additional treatments such as tapping, oxidation, laser engraving, painting, powder coating, electroplating, silk screening, and heat treatment.
5. Final Quality Inspection and Packaging: Conduct a final quality inspection, then package the die for delivery by logistics or courier.
What design parameters do customers need to provide?
When customizing precision stamping dies, clients should provide the following design parameters:
Product Drawings and Dimensions: Detailed drawings of the product, including dimension annotations and tolerance requirements.
Material Information: The type of material used for both the product and the die, along with its physical properties.
Production Requirements: Production batch size, stamping frequency, production speed, etc.
Surface Treatment Requirements: Any specific surface treatments or coatings required.
Die Structure Requirements: Including the type of die (e.g., single-operation die, compound die), working principles, and structural characteristics.
Assembly and Debugging Requirements: Any special assembly or debugging needs for the die.
How to Determine the Size of Precision Stamping Dies?
Determining the specifications and size of precision stamping dies involves considering the following factors:
Die Size: The die size should be designed based on the dimensions and shape of the stamped parts to ensure accuracy and quality. Detailed analysis and calculation of the stamped parts’ shape, size, hole diameter, and layout are required to determine the die’s structural dimensions and shape.
Material Thickness: The thickness of the die material is usually determined by the thickness of the stamped part to ensure accuracy, quality, and surface finish. When determining the die material thickness, consider the shape, size, material, and process requirements of the stamped parts, taking into account factors such as material elongation, hardness, and strength.
Die Structure: For larger dies, the structure design also impacts size determination. The die structure should be designed considering the stamped parts’ shape, size, number of cutting holes, layout, and production requirements to determine a reasonable structural size and shape.
Common materials used for manufacturing precision stamping dies include:
G5, KD20, KX01, CD650, KN20, H40S, ASP23, HAP40, etc.
Strict Design Standards: Adhere to rigorous standards and specifications during the design phase to avoid design flaws.
High-Precision Machining Equipment: Utilize high-precision machinery such as
cnc machining centers and precision grinders for processing.
Quality Inspection: Conduct multiple quality inspections during the manufacturing process, including dimension measurements and surface roughness checks.
Material Testing: Ensure that the materials used meet the required standards by performing material testing to verify their performance.
Production Cycle and Planning: Manage the production cycle and planning to align with the precise requirements for creating high-quality stamping dies.
The production cycle for precision stamping molds varies depending on the complexity of the mold, production processes, and the manufacturer’s production capacity. Generally, creating a complex precision stamping mold may take from several weeks to a few months. The production cycle typically includes the following stages:
Design Stage: Typically requires 1-2 weeks, depending on the complexity of the design.
Machining Stage: Includes material cutting, machining, heat treatment, etc., and may take 2-6 weeks.
Assembly and Debugging: Usually takes 1-2 weeks, involving the assembly and debugging of the mold.
When planning the production schedule, it is essential to consider the time required for each of these stages and coordinate with the mold manufacturer to ensure that each stage is completed on time.
Our company generally provides the following technical support and after-sales services:
Technical Consultation: Professional technical advice and recommendations during the mold design and manufacturing process.
Mold Debugging: On-site debugging services after the mold is delivered to ensure it operates correctly.
Maintenance and Care: Maintenance and repair services, including regular inspections and repairs of the mold.
Training Services: Training for operators to ensure they can correctly use and maintain the mold.
After-Sales Support: Warranty services for the product, addressing any issues that arise during use.